Are you finding the correct PETULTRA Automatic Feeder Manual Instruction to set up, program, and use your pet feeder without confusion? Whether you have recently purchased the device or need help adjusting feeding schedules, understanding the feeder’s functions is essential for smooth daily operation.
The PETULTRA automatic pet feeder manual, setup guide, and programming instructions help pet owners configure meal portions, feeding times, and voice recording features with ease. Proper setup ensures your cat or dog receives meals on time, even when you are away from home.
If you’ve recently purchased the PetUltra Automatic Pet Feeder, you’re one step closer to ensuring your furry friend is fed on time, every time—even when you’re not home.
Many users search for the PETULTRA feeder instruction manual, user guide, and troubleshooting steps to resolve common issues and maximize performance. From initial installation to advanced feeding schedule settings, this resource provides the information needed to operate your PETULTRA automatic feeder efficiently and keep your pets fed on a consistent routine.
Keep your feline friend entertained for hours with our Interactive Cat Toys. Designed to stimulate natural hunting instincts, promote daily exercise, and reduce boredom, these engaging toys provide endless fun while supporting your cat’s physical and mental well-being.
PET Ultra Automatic Feeder Manual Instruction in PDF
Key Sections & Highlights
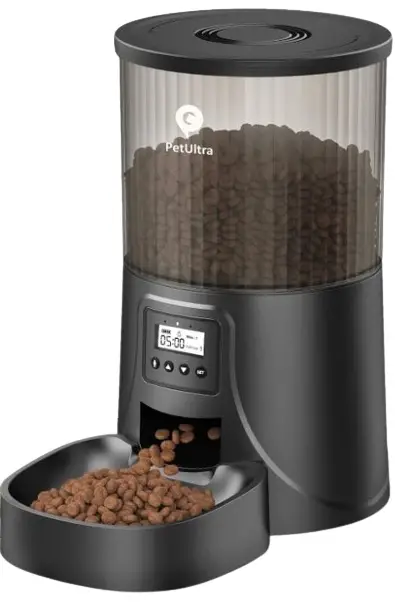
Specifications & Parts
- Capacity: 4 L (≈16 cups), holds up to ~12 lb kibble
- Food type: Dry kibble 2–10 mm (up to 12 mm on newer models)
- Power: DC 5 V/1 A adapter + 3×D-size alkaline batteries (for backup)
Setup & Programming
- Assembly
- Attach the food tray to the base; add dry kibble to the tank and close the lid
- Power On
- Plug in adapter; install batteries if needed
- Set Current Time
- Unlock (long press LOCK ~6 s), hold SET ~3 s until time flashes, then use UP/DOWN to adjust
- Schedule Meals
- With unlocked display, press SET until “MEAL” blinks. Select 1–6 meals per day using UP/DOWN, then press SET again.
- Set pairings of feeding time and portion size (1/8–2 cups) for each meal
- Manual Feeding
- In unlocked mode, press UP + DOWN together for one portion – overrides scheduled feed but does NOT affect the schedule
- Lock / Unlock Control Panel
- Long press LOCK (~6 s) to toggle; red LED will blink twice. Cannot program or manually feed when locked
- Reset to Factory Settings
- With locked display, long press UP ~5 s until you hear “didi” – erases time, meals, portion settings, and recorded voice
Voice Recorder
- Record: Hold MIC for ~3 s (until you hear “di…”), speak for up to 10 s, release to hear “didi”
- Delete: Hold MIC for ~3 s then release (“di … didi”)
Maintenance & Troubleshooting
- Only use dry kibble (no wet/canned food) and keep sizes within 2–12 mm; blockages can trigger an “E002” error
- Clean food tray and base regularly with a damp cloth (do not submerge!)
- Replace desiccant bag monthly to maintain food freshness
- For error E002 (“abnormal feeding position”), check for blockages or large kibble
Tips & Common Pitfalls
- Set portions carefully! e.g., size “16” means 16 tablespoons (1 cup), so mis-setting quantity can overfeed significantly
- Use dual power (adapter + batteries) to keep feeding during power outages
Pet Ultra Automatic Feeder How to Set Time
1. Unlock the Control Panel
Most models have a child-lock feature.
- Press and hold the LOCK button for 5 seconds
- The display will unlock and allow you to change settings
2. Enter Time Setting Mode
- Press and hold the SET button for about 3 seconds
- The hour number will start flashing on the screen
This indicates the feeder is ready to adjust the clock.
3. Adjust the Hour
- Use the UP (▲) or DOWN (▼) buttons
- Select the correct hour according to your local time
Many models use a 24-hour clock format.
Example:
- 07:00 = 7 AM
- 19:00 = 7 PM
4. Set the Minutes
- Press the SET button once again
- The minutes will begin flashing
Now adjust the minutes using the ▲ or ▼ buttons.
5. Save the Time
- Press the SET button again
- The display will stop flashing, meaning the time is successfully saved
Your feeder clock is now set.
Full Manual & Download
You can view and download the complete manual with diagrams, Q&A, and more detailed instructions from here.
Quick Reference Table
| Feature | Procedure |
|---|---|
| Power On | Plug in adapter; optional batteries for backup |
| Set Time | Unlock → SET hold → adjust time → SET save |
| Schedule Food | SET twice to meal mode → select meals with UP/DOWN → SET → set each feed |
| Manual Feed | Unlock → press UP + DOWN |
| Record Voice | Long‑press MIC (~3 s), speak, release |
| Lock/Unlock | Long‑press LOCK (~6 s) (red LED 2 blinks) |
| Reset Factory | Locked → long‑press UP (~5 s), hear “didi” |